
WordPress widgets are fancy tools that makes integrating custom content and features into their website sidebar a hassle-free task for users. With help of widgets, you simply need to drag-and-drop elements that you wish to appear in your website sidebar section such as a category list, featured images and so on. There are a plethora of WordPress themes and plugins that use widgets to perform a certain function. In this post, I’ll walk you through the process of creating a custom WordPress widget for your set up.
WordPress Widgets – An Insight
The basic purpose behind creating widgets was to make it super easy for users to control design and structure of any WordPress themes. Every WP theme comes with “widgetized areas” which is usually the sidebar, however the widget-ready areas are also available in the header, footer and other areas of your theme. For instance, you can display image gallery in your theme’s sidebar or in the footer, by dragging and dropping a widget that implements such functionality.
WordPress comes with a number of default widgets, which includes categories, calendar, navigation menu etc. However, you may find the default widgets insufficient to meet your wants and needs. And there will come a time, when you’ll need to embed some custom functionality into your theme, which cannot be achieved via default WordPress widgets. In that case, implementing a custom widget can help serve your needs.
How to Create a Custom Widget?
The very first thing that you need to do for implementing a custom widget is to get it registered along with the widget area. Let’s say, for example, you need to create a sidebar widget. In that case, you’ll have to register it and the area where you need to add your sidebar widget. For doing so, you simply need to add the below mentioned code in your theme’s functions.php file.
register_sidebar(array(
‘name’ => __(‘My first Custom Widget’),
‘description’ => __(‘You describe your widget here.’),
‘id’ => ‘first-custom-widget’,
‘before_widget’ => ‘<div id=”%1$s” class=”%2$s”>’,
‘after_widget’ => ‘</div>’,
‘before_title’ => ‘<h1>’,
‘after_title’ => ‘</h1>’
));
In this code, the register_sidebar() is a default WordPress function that will register our sidebar widget “my first Custom Widget”. Next, this function is passed an array as an argument to the widget. The array contains different values that helps create the custom (sidebar) widget. Let’s have a look at those values:
name: Assign name to your custom widget. The name can be changed to anything you like.
Description: This parameter specifies what will appear in your theme’s sidebar.
id: This is a key parameter that calls the sidebar widget that you wish to display in your theme’s widgetized area.
before_widget: As the name implies, it place HTML before the widget (‘<div id=”%1$s” class=”%2$s”>’).
after_widget: This argument places HTML after the newly created widget ( ‘</div>n’).
before_title: Positions your HTML before the widget title (‘<h1 class=”widgettitle”>’).
after_title: Places your HTML after the widget title( ‘</h1>n’).
Now that your custom widget (i.e. sidebar widget) is registered, all you have to do is drag and drop that widget into your WordPress set up. To add any widget, you need to move to Appearance>>Widgets screen. But, keep in mind that your custom widget still won’t appear on your WP set up. And to make it visible and use it, you will need to call your widget from the place you wish to display it.
How to Use Your WordPress Custom Widget?
For using your custom widget in your WordPress set up, you just have to copy and paste the below mentioned function in your functions.php file:
<?php dynamic_sidebar( ‘my-first-custom-widget’ ); ?> //my-first-custom-widget is the id of your widget
After executing this line of code, navigate to your widgets panel and you will be able to see your custom widget “My first Custom Widget” in your WordPress back end that looks like the below given screenshot.
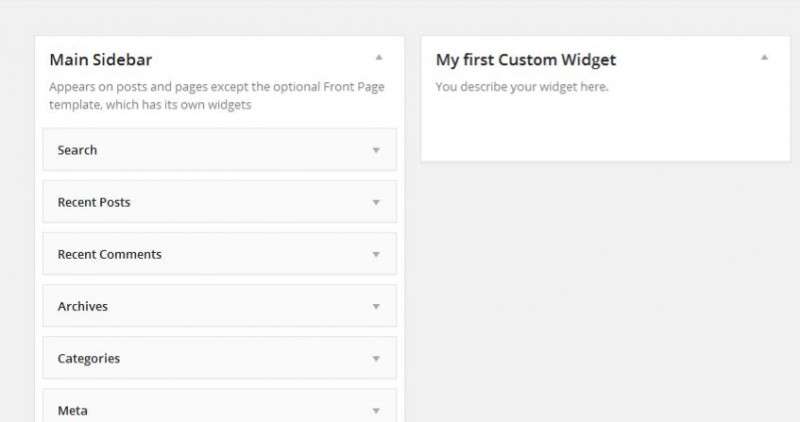
So, now you can drag-and-drop any element in the custom widget area “My first Custom Widget” (as shown in the screenshot above) – that you would like to display in your front end.
Final Words
With time, you may need to integrate new features and functions into your WP theme. WordPress widgets are immensely useful tools that allows you to add custom content to your WordPress set up sidebar. But, you can even choose to embed the content or custom features to your theme’s widgetized regions in the sidebar, header or other widget-ready areas. Though, WordPress comes packed with several default widgets, but there will come a situation where those widgets might not fit your needs. Creating a custom widget, however, will help implement all sorts of things that you would like to display in your theme’s sidebar or widget areas.
I hope the above guide will provide you with a clearer picture of how you can create your own custom wordpress widget in the right way.
About Author: Emily Heming is a professional WordPress developer for a leading PSD to WordPress theme conversion company. She also provides conversion services like HTML to WordPress theme and many more.