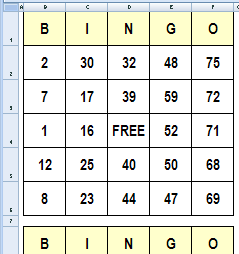
Bingo is a game played for fun purposes. While others play it to get extra cash, it’s basically played for fund raising events. It is also a teaching and learning tool and commonly used by educators to infuse fun in learning educational concepts such as learning numbers and following directions.
A bingo set sold in stores comes with bingo cards and bingo balls. The cards are of regular bingo cards with ordinary bingo terms. However, those who want to have other variations in their bingo cards create their own and use different methods such as manually. This is done by cutting bingo cards with five rows and columns and writing bingo numbers on each square. However, with the computer age, you can skip making it manually and instead create bingo cards using Microsoft Excel program in your desktop or laptop. Here’s how to do it step-by-step.

[sociallocker]
To begin with, you have to open your Excel program and unlike MS Word where you have a page, Excel has worksheet and you must open a new blank worksheet. The next step is to select cells you’re going to use. For this task, you select cells A1 to E6. Drag the cells using your mouse, clicking and holding the mouse buttons. You can use your keyboard by holding the Shift key and the arrow keys for dragging the cells down, left, right and up.
For border options, use the all border to all your selected cells. By clicking the format menu, add height and width to your cells. Click the row height and enter “90 and click OK. Go to column Width and enter 15 and click ok. Your worksheet will have row of 90″ and column width of 15”. For Excel 2007 click Page layout and click on Margins and click on Custom Margins., For Excel 2003 or earlier, you have to click File and then Page Setup and click the Margin tabs. Select Center on Page Horizontally and Center on page vertically and click OK to center your cells on your worksheet.
For the free space, go to Insert menu and hover your pointer to Picture and select AutoShape and insert the selected shape in your Cell 4C. Click Add text and type Free. Go back to Format Auto Shape and go to Font to change the font of the text and if you want color, go to the Color and Shape and right click your desired color.
To format your cells, right click and choose Format cells. Go to the Font tab and select big and bold font size and color. Arial Rounded bold is commonly used and red color for font’s color. To enter an upper case B into cell, go to the Alignment tab and click on Center for both vertical and horizontal breakdowns. Do the same with the next cell, entering letter I and continue entering letters until you filled up all cells with BINGO letters. This serves as your bingo template. Save it to create your bingo cards by entering bingo numbers, symbols, picture clips on your cells and make sure, you randomly used each terms to make your bingo cards unique. For added reference what to terms to use, visit bingo sites and get some ideas.
With your newly created bingo cards, you can play bingo games with your friends and share with them the fun of playing this game. However if you want the “real bingo” fun plus winning some money you can play on best new bingo sites 2014 here and have double fun out of your bingo playing.[/sociallocker]
